![]()
WebWave drag and drop website builder lets you create unique websites. You can build your website from scratch by starting with a blank page, or choose various website templates from our free collection and modify them according to your needs. With WebWave website builder, you have a complete website design and hosting system at your fingertips.
This website was created with WebWave.
Find us online
Useful articles.

Categories.
Menu
In WebWave website builder element Menu is responsible for adding navigation to your website which allows users to easily move through subpages. In this article, you will learn how to build a website adding effective navigation.
Add Menu to your website
In website builder WebWave you can add menu from the toolbar on the left side of the builder. All you have to do is to select an appropriate icon, drag it and drop on your website.

When you add a new menu on the website, a window is displayed where you can add a new button with the appropriate click action or confirm the current layout by clicking on the cross icon.

Menu edition
In order to edit a menu, right-click on it and select "Edit content".
Add subpages to Menu

To add a subpage to your menu, move it from the right window where you can see all the subpages to the middle window where you will see all the subpages already included in the selected menu.

Add links to Menu
To add a link to menu use the "Add button" field. Change the tab to "Linked to". In the "Page name" field enter a name that will be displayed as a new Menu item. The "Link to" field allows you to choose a link type you would like to create.

- None - creates a menu element without a click action. This option is particularly useful when building a two-level menu. When a user hovers on this element, it unrolls showing the second part of the menu.
-
Go to object on the page - creates a menu element, which after clicking transfers users to a certain element on the chosen page. Select "go to object on page", choose subpage and element on it. If you don't know a name of the selected element, click on it and read its name from layers panel (the element shows up in green color).
-
Webpage - creates a menu element which after clicking transfers users to a certain subpage on your website.
-
Go to newspage- creates a menu element which after clicking transfers users to a certain newspage on your website.
-
Website address - creates a menu element which after clicking transfers users to a website of your choice. Type URL address in the "Website address" section and choose whether it should open in a new browser window.
-
More - creates a customized menu element:
- Telephone - runs default calling application like Skype on users' computer or automatically dials a mobile phone number of your choice on users' phone.
- E-mail - opens default mailbox application like Mailbox (Windows 10) on users computer or Gmail on users mobile phone and automatically puts a recipient e-mail address of your choice.
Remove subpage from Menu
1. In order to remove a subpage from menu click the "edit" button.

2. Then click the "remove" button. Done, subpage removed.
Change subpages' order in Menu
To change subpages' order, just drag a subpage from the middle window and place it where you want it in your menu.
Build a two-level menu
In order to add elements to the second level of menu, sort the elements' list and place it "under" the first level button.

Change the Menu button label
To change the button label in Menu, enter the Menu editor and click "edit" next to the selected subpage. Then in the "Name" window enter a name you want to see on the Menu button and click "Save".

In the Menu Button Info tab you can also set whether you want the link to open in the same tab or in a new one after clicking on it. You may see the original title of the website to which the button leads to here.
Menu settings
In elements' edition panel select "Menu settings" to see additional features.

-
Add webpages - each new subpage added to your website will be automatically added to menu. If you don't want any subpages to be automatically added to menu, untick the box.
-
Spacing - set spaces in pixels between menu buttons.
-
Menu type horizontal/vertical/mobile - set menu type: horizontal, vertical and mobile. Read a detailed guide on how to create a mobile/hamburger menu.
-
Submenu - choose in which direction menu should roll out (top/bottom/auto).
-
Menu alignment - here you can set the Menu alignment.
Change Menu style
Change Menu type: horizontal/vertical/mobile
To change menu type in WebWave website builder, select in the element edition panel "Menu type" and choose amongst horizontal, vertical and mobile. The direction of menu rollout you may select in the "Submenu" tab.
Change Menu style
In order to change menu style, all you would have to do is to click one time on it. In the side edition panel set attributes like in any other element. You may change background color, visibility, borders etc.
Change the Menu button style
-
Normal State - to change the style of a single menu button, double click on it. The blue frame will appear and in the Settings panel you will be able to edit a single button's style and its content.

-
State: Hover - to change a style of a single menu button when a user hovers over it, select in the Settings panel "State: Hover" and adjust button's style and content accordingly.

-
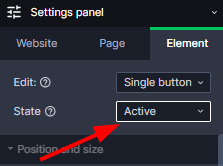
State active - a state of the linked subpage which is currently open. In order to edit this state, select in the Settings panel "State: Active" and adjust style and content.
One menu button looks different than others
If you want one menu button to look different than others, double click on it and in the Settings panel select "Same button design" and untick a "Use default level style" box.
From now on, every change made to this button will not cause the changes in the other buttons (in style or content).
