

Check out features in WebWave website builder.
Smaller changes in WebWave website builder are implemented almost everyday. More serious modifications are applied a few times a month. We do all of this so that you could create a website looking exactly how you want it to.
View news by the year:
WebWave news archive.
More detailed description of new features and a discussion on them you can find on WebWave's Facebook Group, here.
WebWave Features 2021.
Read the summary here.
December
21st December 2021
-
Edit cookies bar content. You can edit text, links and you can create a different text for different language versions of your website. With this feature, you'll be able to fit cookies bar to your own needs.
-
Discount codes in WebWave shop. With this feature, you'll be able to launch a discount and promotions in your online store easier.
-
Ability to perform mathematical operations in position fields. Thanks to that, if we want to move an element by 50px to the right, it is enough to write +50 in position x field and the element will be moved accordingly.
-
In the element settings panel, the page background setting has been moved to its own tab. This ensures that this very frequently used feature is always at hand.
-
In the map settings pop up, the zoom slider has been replaced by plus and minus symbols. This makes it easier to zoom in and out of the map view.
9th December 2021
-
Adding a font from your device to your website (.ttf, .otf, .woff, .woff2 formats are available). With this feature, you'll be able to use wider verity of fonts to create even better websites.
-
"Edit content" button has been moved to element's settings tab from the top of element's settings panel. This frees up some space in elements settings panel, which is super important on smaller screens.
-
When you add element groups one after another, they are bound together. With this feature, you can create a website adjusted to mobile screens using element groups super fast.
-
We've introduced a couple of smaller improvements to element groups. With these improvements, using those groups is much comfortable and convenient.
November
25th November 2021
-
New crossfade options have been added to animation of gallery and slider. With this feature, you can precisely control how your images change one into another.
-
Interface of Show and hide animation section in elements panel has been improved. With this feature it will be much easier to use these features, since the interface is much more user-friendly.
-
We've updated, how fields in "Position and size" section of elements panel are locked, when you cannot change them for some reason. This change improves the looks of Position and size section significantly.
10th November 2021
-
Editing the order of layers in layout without having to open that layout. With this feature it will be much easier to control your layout design, since you don't have to switch your view.
-
Face lifting of slider settings and adding switches to control those settings. This feature makes editing slider settings easier and more user-friendly
-
Upgrade AutoRWD feature. With these features, AutoRWD option works better and there is less manual work needed to adjust your website to mobile screens.
4th November 2021
-
"Crossfade" animation type for buttons has a new blending option. With this feature you will be able to create even better-looking buttons, that animate exactly as you like.
-
We've improved the looks of locked sections in settings panel. This feature will make it more visible, which settings are available, and which are locked.
October
28th October 2021
-
We've changed the font used in website builder from Arial to Inter. We've chosen this font carefully, and it makes all the settings and panel more readable and clear.
-
Changing a thumbnail for a group is now possible. This will make it easier to manage those groups, especially if you have more of them.
20th October 2021
-
Adding folders to your personal quick element groups. With this feature it's much easier to manage and maintain a lot of your own element groups, and build websites from those building blocks.
-
Easier editing of elements visible on all pages. Such elements are clearly marked instead of locked. With this feature it'll be easier to handle elements visible on all pages.
-
Community templates. With this feature, webmasters can submit their templates and get commission whenever a WebWave user will use such template.
13th October 2021
-
You can double-click an icon in an icon bank to add it to your website. This way your work with icon bank will be faster and more comfortable.
-
We've improved stability and smoothness of the slider. With this feature it will be easier to create a good-looking slider on your website.
-
When you're creating a new website from a template, the email address in contact forms will be automatically set to the website's owner email. This way, creating a working website will need less configuration.
September
30th September 2021
-
You can manually set how elements are bound in every RWD mode. With this feature, you'll be able to create mobile versions of your website faster, and you'll have more control over how your mobile website looks like.
-
We've improved how the new slider looks like and how it behaves on mobile websites. With this feature, it will be easier to create a good-looking slider for mobile devices.
-
There's an option to enter e-commerce settings from the top menu in website builder. With this feature, e-commerce settings are easier accessible.
22nd September 2021
-
We've improved the behavior of Webmaster's Panel on mobile devices. With this feature, it will be much easier to administer your websites with your phone.
-
We've introduced Starter, Pro and Business Premium Plans instead of only one plan available so far. This will make it easier for customers to pick the right plan for their needs.
-
We've improved graphics design and changed order of tabs in Elements Settings Panel. This will make it easier to find the most important settings, since they will be always on top.
-
We've introduced a new status bar on status.webwave.me page, that's monitoring if sending emails with WebWave's servers is possible. With this feature, you can be always informed if everything is working fine with WebWave.
-
We've expended the email received after a customer places an order in the online shop with information about what he agrees on. This will make it possible for you to, for instance, send newsletters only to people who explicitly agreed to receive them.
8th September 2021
-
We have added the ability to apply filters to the photo. The function is available in the photo editing window. Thanks to this, you can, for example, create a button in which, when you hover the mouse over, the background image blurs.
-
We've increased the available workspace in the item settings panel by removing the included icons for copying items and reordering layers. Thanks to this, the access to the more frequently used options has been facilitated.
-
We've significantly improved the use of the menu editing window, allowing tiles to be dragged smoothly and transformed into second-level menus. This will greatly increase the comfort of working with menu editing.
2nd September 2021
-
We improved the meta descriptions for the pagination icons in the article list. Thanks to this, the optimization of pages for SEO will improve.
-
We improved the graphic designation of the group on the list of layers after selecting it on the workspace. This makes it easier to find selected items in the list of layers.
-
We improved the design of the vertical slider to dynamically change the width of the working area. Thanks to this, the wizard looks more aesthetic.
-
We have added an advanced options switch in the tab showing and hiding elements. This keeps the more frequently used functions within easy reach than the advanced functions.
August
25th August 2021
-
Ability to add an action after clicking on a photo in the image grid. This gives us more control over the behavior of the photo gallery and can create a "link gallery".
-
By default, the mobile menu is displayed from the right edge of the page with the background color set to white. As a result, the default settings of the mobile menu are more universal and a satisfactory graphic effect can be obtained faster.
-
Now the 100% width function can be turned on using a convenient switch instead of the old checkbox. This makes the item settings panel look more aesthetically pleasing.
18th August 2021
-
In the online store, when selecting a product variant, you can see the total price of that variant, not just the difference to the base product. Thanks to this, the customer has a better understanding of how much a given variant of the product costs when shopping, because he can see it immediately, and not only in the order summary step.
-
In the online store, in the second step of the order, headers organizing the entered data were added. This will make it easier for the customer to fill in the order form correctly.
-
In the mailbox management window, we have added information on how to increase the available space for mailboxes. Thanks to this, you will always have enough space for additional emails.
13th August 2021
-
In the layers panel, a text layer is named by default according to the first words of the text entered in the element to which the layer applies. This makes it easier to keep order in the layer list and to distinguish which layer applies to which item
-
Agencies can apply to the list of WebWave certified webmasters. Thanks to this, people with experience in creating websites in WebWave will be able to receive more customers, and people who do not have time or are unable to create their own website will be able to ask a professional for help.
-
The item rotation button has been reworked into a more convenient switch and moved from the position to style tab. As a result, the information architecture and the visual layer of the Positions tab in the element settings panel have been improved.
5th August 2021
-
Possibility to edit the number shown in the animated counter by the CMS Editor
-
Elements can take a position relative to the screen size (vh and vw) only if the position of the element is dynamic. This makes it easier to use the relative positions of the element.
-
In the checkout window in the online store, the country of the buyer is set automatically. Thanks to this, you can create a better online store that sells products to foreign customers.
-
The ability to create and add to the library an unlimited number of your own groups of elements. This makes it easier to create repetitive elements on pages and transfer elements between different projects.
-
The text editing panel is set in a new place and can be moved freely with the mouse. Thanks to this, the text editing panel will not interfere with the creation of the page.
July
28th July 2021
-
A random graphic showing interesting features in WebWave is displayed during the loading of the editor - an opportunity to get some inspiration and learn about interesting features.
-
The ability to grant a commission to people who create and share templates on external sites after registration of another user directly from the shared website design link (template).
-
The automatic addition of the active discount code to the order.
21st July 2021
-
In the e-shop, the customer has the choice whether to pay at purchase or on delivery. This will be useful e.g. when customers collect goods in person after the purchase (e.g. in a restaurant).
-
For each RWD mode you can set a different position of hooking and unhooking elements while scrolling the page. This will be useful when creating more graphically advanced pages with the "wow" effect
-
DKIM record is generated for all domains connected to WebWave. Thanks to this email will work more stably
-
It is possible to run a test mode of online payment in the web shop. This will allow the webmaster to better test if everything works OK when creating the shop
12th July 2021
-
Post-purchase messages with content depending on the purchased goods. With this feature, you can automatically sell digital products in your WebWave store.
-
Possibility to set other binds of elements for different RWD modes. This will be useful for creating mobile versions of more complex pages.
5th July 2021
-
Possibility to redirect the customer to your URL after making a purchase in the online store (useful when we want to show the customer personalized information after the purchase)
-
Possibility to add additional fields to be filled in by customer in the order finalization window (useful when we need the customer to provide additional non-standard information or his expectations about the purchased product)
-
Change the size of mailboxes yourself. So you can, for example, independently increase the capacity of a selected mailbox from 5 to 10 GB. See how to use this feature
-
Automatic RWD for all subpages at the same time (thanks to this you can create the RWD version of the page even faster)
June
28th June 2021
- Updates to Auto RWD function, which automatically adjusts your website to mobile screens
21st June 2021
-
Message visible after making a purchase in an online shop is also sent to a customer in an email after purchase
-
Setting and elements position in % instead of px has been removed, where it makes no sense. This will make it easier to use this feature, and minimize mistakes.
-
Improvements to the layout of text visible after filling a form. Text can consist of multiple lines.
-
You can create a bullet list in the text visible on your slider / gallery images.
9th June 2021
-
Possibility to add a counter element on the page
-
You can choose if your customers have to provide shipping address while purchasing in your online store. This is useful to sell digital goods
-
While positioning objects on your website in vw or vh instead of px you will be able to pick only full positions. This will make it easier to match one object to another.
May
26th May 2021
-
Possibility to enable / disable displaying an item when you scroll through the page
-
Possibility to enable / disable the icon of Accepting of shop terms and conditions in the Webwave online store
April
22nd April 2021
-
Possibility to add product shipping options in the online store settings
-
Possibility to customize the WebWave affiliate link
-
Possibility to handle project comments from the Webmaster Panel
March
25th March 2021
-
Individual taxes for a product in the WebWave Cart
-
Notifications about new comments in the Webmaster Panel
-
WebWave cart- product variants
-
Set the footer anywhere in the list of layers
-
Unhitching components
-
Speed up web pages - part 1
February
-
Set the "scroll to top distance" for fixed elements
-
Global control of the comment mode bar for all pages
-
Independent control of the comment mode bar from the page settings level
January
28th January 2021
-
Individual Cart settings for each language version of the site
-
Automatic sending of e-mails about unfinished payments
14 January 2021
-
Comments on the website project
WebWave Features 2020.
December
10th December 2020
- Now You can pay by Stripe Payment Processing Platform
- Improvements in the Webmaster Panel for accounts with a large number of pages
- Choose a template and category when adding an article
- Simplify the Editor menu
November
November 26, 2020
- Now You can pin an object to the top of the page while scrolling
- A more useful interface for working with dynamic elements
- A more convenient payment management window for the Premium Package
5 November 2020
- Duplicate articles - new feature
October
October 22, 2020
- New bindings of elements and groups
- The bar with creating a new page, filters and searching for pages in the Webmaster Panel is always visible at the top of the page list
October 15, 2020
- Integration with Przelewy24 in the WebWave Basket
- White label sending of weekly website traffic reports
October 1, 2020
- Webmaster Panel - sorting pages according to the expiry of Premium Packages
September
September 24, 2020
- New website builder menu editor window
- The most important actions of the item are also available in the settings panel
September 10, 2020
- Form - possibility to switch to an advanced text editor
- Smooth page width adjustments in the WebWave creator
September 3, 2020
- List of subpages and articles now in new place
August
August 13, 2020
- Webwave.dev domain for free sites
- Easier duplication of items
August 6, 2020
- New agency domain for Agency accounts
- Viewing the status of the agency domain and SSL certificate
- Weekly site statistics reports sent to any email
- Improvement of own element groups
July
July 30, 2020
- Easier work with the image grid
- The effects of items when you hover over them with cursor
July 9, 2020
- Change the default header to H2
June
June 25, 2020
- Now you can have SSL for pages - in agency domains
- A new way to control versions for mobile screens (RWD)
- Easier to set your own address
June 10, 2020
- Faster loading fonts from Google on published pages
June 4, 2020
- Possibility to go to the selected subpage from the level of editing the button in the website menu
May
May 28, 2020
- Now the publication of the pages is faster then ever
May 21, 2020
- Dotpay payments are available in WebWave basket
- Improving the operation of the Auto RWD function
- Improvements in interactions
May 14, 2020
- Element effects for the button
- Icon bank available in an advanced text editor
- Webmaster's panel - the ability to show only pages with an active Premium Package
April
April 30, 2020
- Item Effects - Filters
- Copy and paste the appearance of an item
- Facilitating the arrangement of elements at equal distances
April 23, 2020
- Improvement of pasting elements
- Easier action selection after clicking while editing an article or page by CMS
April 16, 2020
- Element effects
- List of articles - the ability to disable the ellipsis
- Remembering the state of the layer panel
April 9, 2020
- Easily select the position of the text field in the slider
- More convenient filtering and sorting in the Webmaster Panel
- Speed up the loading of images on published pages
April 2, 2020
- Store - easier access to the Ecwid system
- We improved image compression in RWD versions
March
March 26, 2020
- The Auto RWD function takes into account elements shown on many subpages
- Elements shown on many subpages can be set in different positions
March 19, 2020
- The chat button can be moved in the wizard
March 12, 2020
- Custom element groups
- Quick display of the item size
- Improving the Auto RWD function
- Advanced control over the position of the text in the slider
- Accelerate the loading of published pages
- Text editor improvement
February
February 20, 2020
- Facilitate linking in the text
- Improving the Auto RWD function
- New look of the side panels in the Webmaster Panel
- SSL (https) also available for free sites
- Larger fonts to choose from in text editors
February 6, 2020
- WebWave basket - the ability to set the shipping cost
January
January 30, 2020
- Now You can set pictures in mosaic image grid
January 16, 2020
- WebWave basket
- Simplified text editor
- Designation of an element when we hover over it with the mouse
- The wizard is available in Safari and Opera browsers
WebWave Features 2019.
Read the summary here.
December
December 5, 2019
Automatic formatting of images to .webp format on published pages
Thanks to this change, published pages load faster. This improves user comfort and the position of websites in SEO rankings.
Searching subpages, articles or elements in Action
Now you can create internal links faster and find the desired items on the selection list.
How to use this feature?
Select the item for which you want to create a link. In the Settings Panel, expand the Click action (link) section.

Choose one of the following options: Webpage, Go to newspage or Go to object on page. Start typing the name of the relevant part of the page. The website builder will search for it automatically.
We have restored the context menu
This makes it easier to remove an item, copy it, paste and move it underneath or on top.
How to use this feature:
Just hover over the selected item and right-click.
Adding subpages in the menu editing window
Thanks to this, you will create your menu faster without thinking about how to create a new subpage.
How to use this feature:
Create a menu by clicking the Website menu button in the panel on the left. You can also edit an existing menu.

In the menu editing window, enter the name of the new subpage and click the Add button. Then click Save.

The new subpage will be visible in the menu editing window. A new button will appear in the menu and a new subpage will be created automatically.

12 December 2019
Finder for articles and subpages in the Click action (link) section
Thanks to this function you will find the subpage or article to which you want to add a link.
How to use this feature?
Select the image or button to which you want to add a link. In the Settings Panel in the Element section, expand the Click Action (link) list. Then click the on magnifying glass icon.

Now you can enter the title of the subpage or article that the item should lead to.
PWA - website as an application (Progressive Web App)
Thanks to this function your website will look like a mobile application. Users will gain access to the site by clicking the icon on their phone or tablet.
How to use this feature:
First, choose a graphic that will become an icon on the user's desktop. In the Settings Panel in the Page Section expand the General settings list.

Click the icon symbol and select the appropriate image. Then publish the page.
Application on mobile devices:
After entering the page through the browser, a message will appear informing you that the application can be installed.

After clicking the button, an icon will appear on your desktop leading to your site.

The application opens in full-screen mode and also works when the device is not connected to the internet.
Application on computers:
When you enter the site, a plus icon will appear in the address bar.
After clicking it, an icon will appear on the desktop of the device leading to the page.
The PWA function is available for websites with a Premium Package, connected domain and SSL certificate.
November
14 November 2019
Automatic adaptation to other elements when the element is resized
Thanks to this function, it's easier to set elements relative to each other. All you have to do is start changing the size of the selected item, and the website builder automatically adapts it to other elements on the page.
November 28, 2019
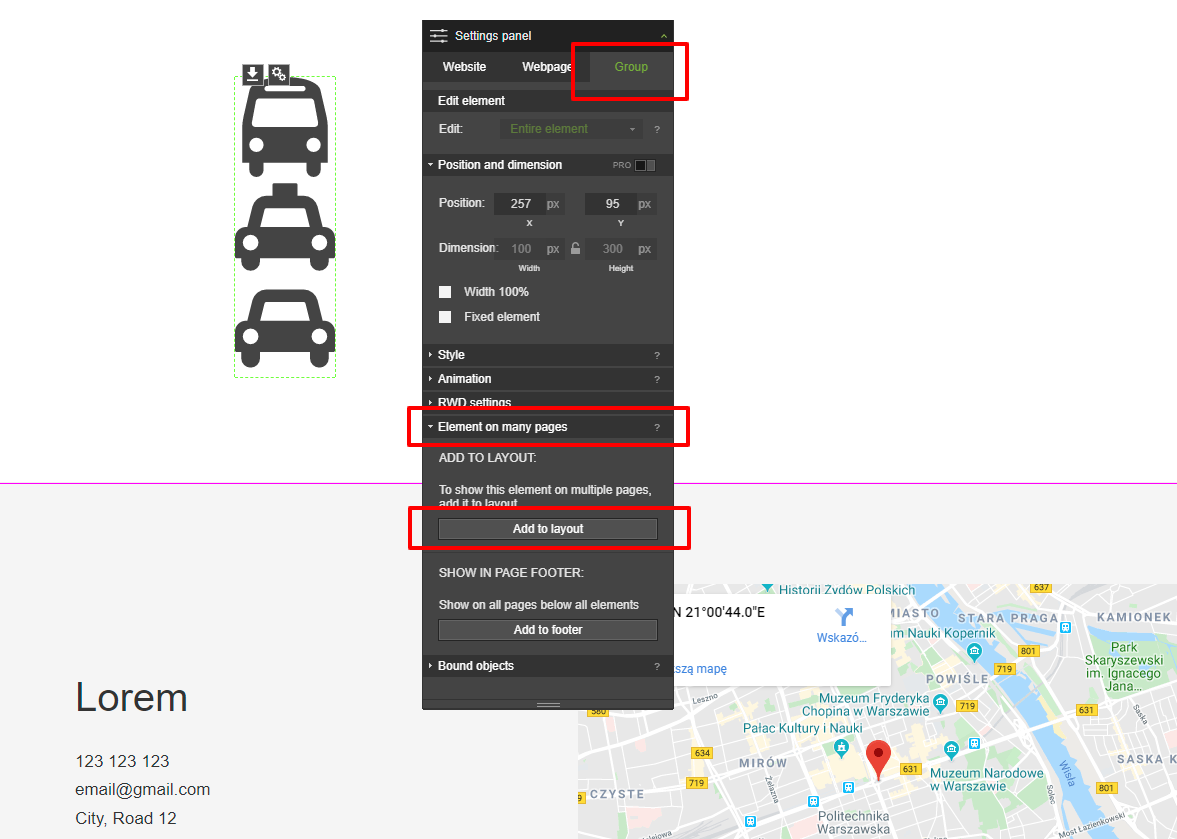
Adding groups to the page footer
How to use this feature?
Select the group you want to add to the footer. In the Setting panel select the Group tab, then expand the Element on multiple pages section. Click the Add to footer button.
You can also group items that are already in the footer. To do this, select them and click the Add Group button in the Layers panel.

October
10 October 2019
Messages sent via the contact form: the URL of the page from which the message was sent, visible in the footer
This feature will be especially useful for users who have several pages with contact forms. From today, every message sent via the form contains the URL of the page where it is posted.
How to use this feature:
When the user sends you a message via the contact form, the footer will include the URL of the page where the form is located.

17 October 2019
Automatic alignment with other elements
Thanks to this function, you can easily and quickly create an aesthetic and user-friendly website much faster than before.
How to use this feature:
When you drag an item on the page, the wizard automatically aligns it so that it is placed symmetrically relative to the items that were previously placed on it.
Editing images in the Photo bank
Modifying image files has become even easier. We have added access to the image editor directly in the Photo bank.
How to use this feature:
In the Photo Bank, select the file you want to modify. Then click the Edit image button. You will be taken to the image editor.

Easier selection of transparency
You no longer have to enter the color palette to change the transparency of the background in an element.
How to use this feature:
Select the item you want to modify. In the Settings Panel go to the Appearance section. To the right of the color palette field, you will find a drop-down menu. Choose a transparent option.

The background of the selected item will become transparent.

24 October 2019
Easier access to site backups
Now restoring the version of the page preceding its publication is even easier. You always have access to the icon responsible for this action. We put it in the top bar of the wizard.
How to use this feature:
To undo the changes, click the Restore Page icon and then the Restore button. The icon appears only after the first publication of the page.

31 October 2019
Groups within groups
Now you can combine elements inside existing groups. This feature makes it easier to work with more graphically complex projects. You can create 5 levels. Thanks to this, changing the position of many elements becomes easier.
How to use this feature:
Select the items you want to put in the new group. In the Layers panel, click the Add group button.

Now you can freely change the position of a new group of elements.
If you want to speed up working with groups, use the keyboard shortcut CTRL + G for grouping and SHIFT + CTRL + G for ungrouping elements.
The use of groups also improves the work of automatic RWD.
Faster pages publication
Now websites created with WebWave publish up to 75% faster than before. The difference is especially visible in the case of extensive websites with many subpages and articles.
Webmail adapted to mobile devices
Using our e-mail has become easier. We have adapted it to the screens of smartphones and tablets. Thanks to this, you can easily answer messages wherever you are.

Clear element names in the layer list after copying the subpage
When copying subpages, annotations "_copy" no longer appear.
September
4 September 2019
Image editor
Placing personalized photos on your site is easier than ever before! With Image editor – our latest tool – you can convert image files found in My images and files.
Check and use following functions:
• Cropping;
• Flipping;
• Applying shapes and icons;
• Applying text;
• Adding a mask;
• And a wide range of filters that you can use when editing an image.
How to use this functionality?
Select the image you want to edit from My images and files. Press the Edit image button at the bottom.

A new window will open. The functions that you can apply to the image will be displayed at the bottom.
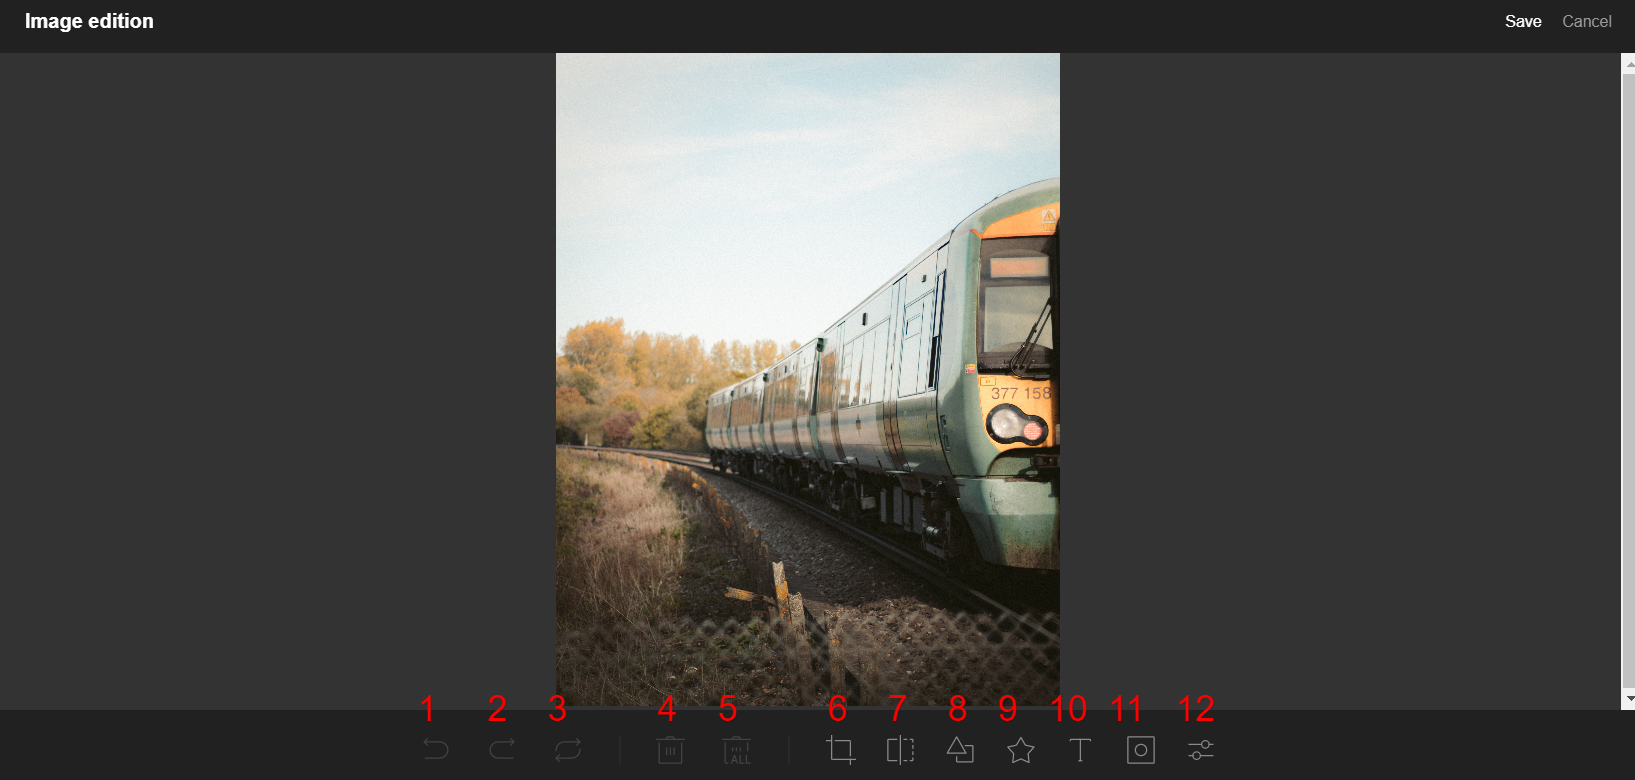
The first two functions are responsible for undoing and re-entering the change and (3) rolling back all changes. To remove a specific element, use the trash can icon (4). The same icon with the word ALL (5) is responsible for removing all elements. Following icons are relate to following functions: cropping (6), flipping (7), adding elements (8, 9, 10 and 11) and applying filters (12).
After you save the image, it will appear as a copy – any changes you make will not affect the original image. With the image editor you don't need an external graphics program – you will find all the basic functions within the website creator!
Elements and group binds
Our wizard has been offering the function of binding groups of elements for a long time. Now we have decided to expand this feature by adding the function of binding individual elements.
You don't have to worry about overlapping elements anymore.
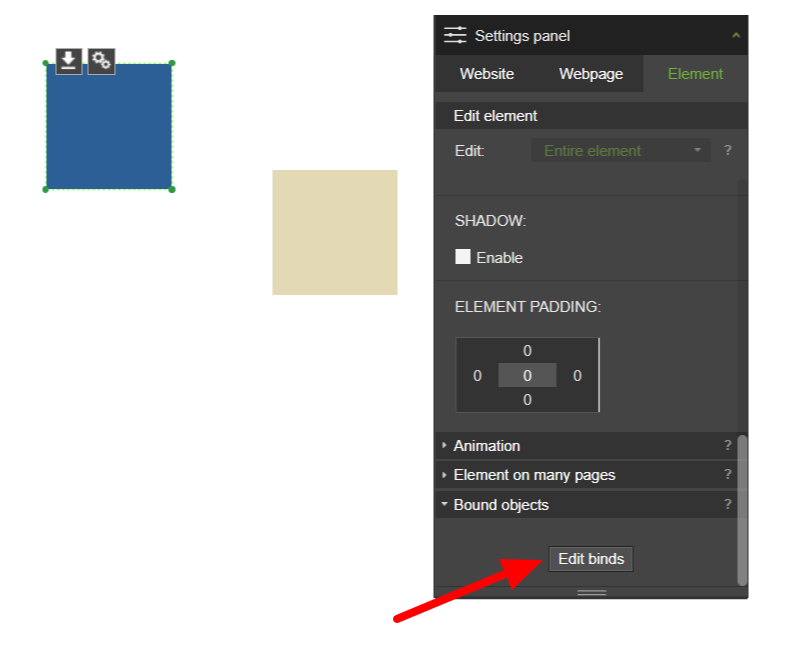
How to use this functionality?
After entering the wizard, select the item that you want to repeal another. In the Settings panel go to the Bound objects section and select Edit bind.
For the remaining elements, you will see a plus. Click it to push the two elements away.
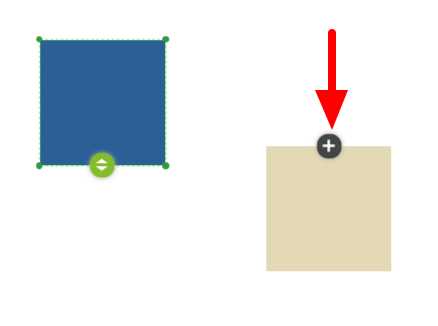
The bind will be visible. You will be able to remove it by pressing X on the element. Mark the element by using green lines to see if it's bound to the other element.
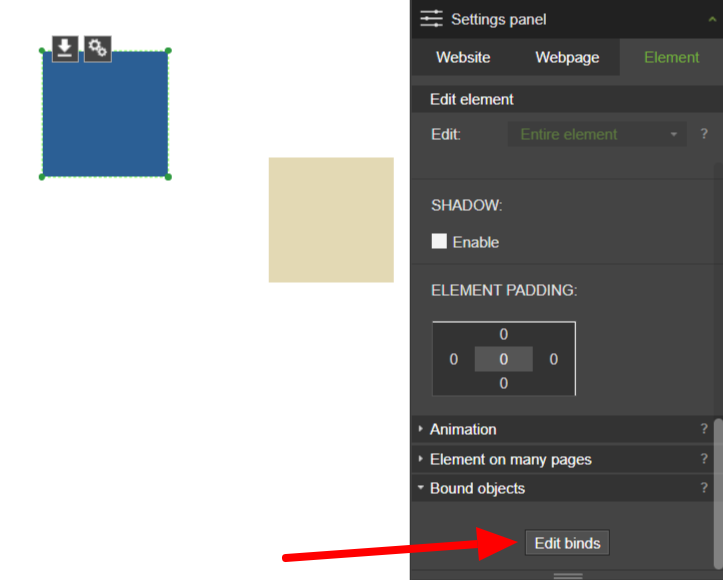
From now on, you can create any binds between both individual elements and their groups. This will help you place individual sections on the page you create. You don't have to worry about undesired overlapping of elements.
13 September 2019
Displaying articles assigned to any number of categories in the list
This option will be especially useful for you if you run a blog or online store. Thanks to it, your users will gain easier access to content related thematically.
We have introduced the ability to edit the list of articles in such a way that it is possible to simultaneously display articles from several different categories.
How to use this functionality?
Select the article list you want to edit.

In the Settings panel, expand the Newsfeed settings section.

In the Display categories option, set Selected category, then click Select to proceed to editing the list of articles.

Now you can choose the article categories that will appear in the list. Confirm the change by clicking OK.

19 September 2019
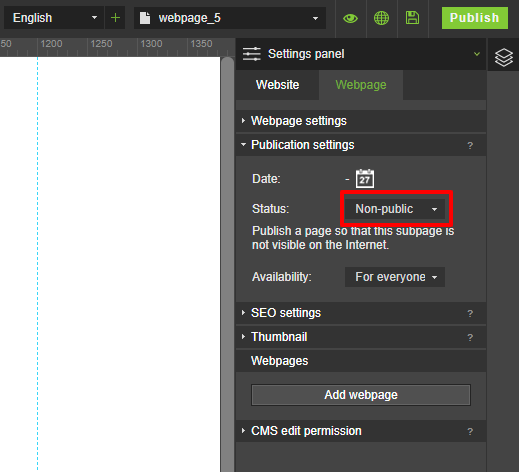
Setting the non-public status for webpages and articles
Use this function if you are in the process of creating a page and do not want to publish some content yet. Now you can choose webpages and articles that will be invisible on the Internet.
How to use this feature?
In the Settings panel select the Webpage or Article tab.
Go to the Publication settings section.
Change the status of the webpage or article to Non-public and click Publish. This will hide the content from users of the page. The content will still be visible to you in the creator.
A palette of your own colors
This feature will allow you to create more coloristically-consistent websites. You can save any color in the Color selection panel. You will always have them at hand.
How to use this feature:
Select the element you want to edit. In the Settings panel, expand the Style section and click the Color icon.
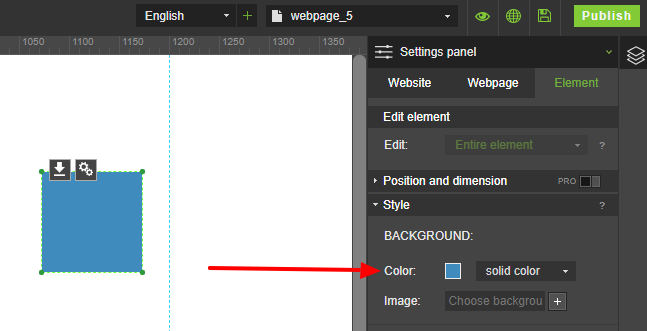
To add a color to the palette, click the plus icon.

You can change the order of colors by drag and drop. To remove a color from the palette, simply drag it outside the panel.
Uploading the ads.txt file
This feature will be useful if you want to monetize the ads displayed on your site. Creating the ads.txt file will enable you to use Google AdSense. This will give you control over who publishes ads on your site. You can easily block content that you don't like.
How to use this feature:
Create an ads.txt. file in your AdSense account. Detailed instructions on how to do this can be found here.
Go to the WebWave wizard. In the Settings, select the Marketing and analytics section.
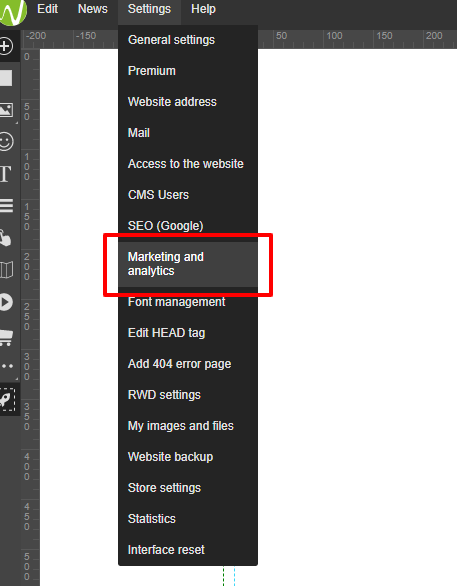
Select the advertising tab.
 Upload the ads.txt file from your device's disk.
26 September 2019
Automatic RWD for images added in a text element
Now customizing your site for smartphones and tablets is even faster! The images you add inside the text element will automatically adjust to the type of screen on which your site is displayed.
how to use this element?
Simply place the image in the text box. Its width will be adapted to the type of device.

August
1 August 2019
Integration with Google Analytics
Even though you could have connected Google Analytics to a website created in WebWave before, now you can do it in a more intuitive way.
How to use this feature?
Enter website builder and in the menu at the top of the screen select Settings and Marketing and analytics.

In the popup window copy the code from Google Analytics. If you don't know how to get the code, read a guide article on Google Analytics in the Knowledge Base.

New, intuitive way of setting your domain
To register a new domain or connect a domain purchased from a third-party provider, enter the Webmaster's Panel and select Set your address next to the website.

In the new window, you can register a new domain in WebWave or connect previously purchased domain.

8 August 2019
Automatic RWD
You don't have to dedicate time to set elements alignment in RWD anymore. Automatic RWD does it for you on all four sizes of a screen.
How to use this feature:
Log in to the Webmaster's Panel, enter the builder and select tablet or mobile screen at the top RWD menu. Next, select a wand icon to activate Automatic RWD.

Set individual HEAD for articles and webpages
Now you can set different HEAD for articles and webpages. This functionality is particularly useful when you paste code to an ad or schema.org.
How to use this feature:
Sign in to the Webmaster's Panel, enter website builder and select an article or a webpage, which HEAD you'd like to change. In the Settings Panel choose Webpage/Newspage and in settings edit HEAD code.

In the new window paste the code and save changes.
14 August 2019
New way of adding webmasters
Teamwork is one of the most unique features in WebWave. Now, you can add webmasters to work on a project with you in a new way!
Enter the Webmaster's Panel and next to a website press More options. In the menu, select Access to the website, where you can add new members and manage them.

Enter the e-mail address of the new members. They will get an e-mail with an invitation to accept.

After accepting the invitations, new members will see the website in their Webmaster's Panel.
Styling changes in the Webmaster's Panel
We have introduced a few styling changes in the Webmaster's Panel to make working in it even more intuitive. What's changed?
- Websites with an active Premium Plan got a blue ribbon;
- Button "Renew Premium Plan" is now in the "More options" menu;
- The color of "More options" and "Enable Premium" has been changed.
Pasted elements appear above the selected layer automatically
From now on, pasted elements appear above the previously selected layer automatically, not at the beginning of the Layers panel.
How to use this feature?
Copy any element on a webpage (we copied the green rectangle), then on a different webpage select a layer and paste the element. It will appear in the Layers panel above the selected layer, not at the beginning of the panel as it would before.


Thanks to this feature, pasted elements do not appear at the top of the Layers panel, which means they no longer overlap all the other elements on a website.
22 August 2019
Edit content and click action of buttons in an article
We keep improving articles in WebWave and from now on users can change content and click action of buttons placed in news created with an article template.
How to use this functionality?
Add a new article using a news template with a button.
If you want to use this functionality on an article that already exists, enter the article template, click on the button and in the Settings Panel in Edit permission tick the box next to Articles:
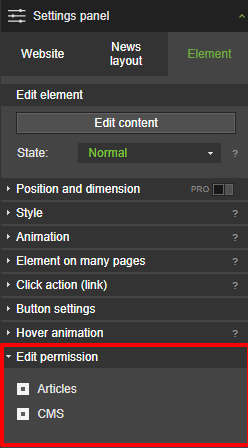
In the article, click on the button and select Edit content.
In the Settings Panel you can set the "Click action (link)".
After publication, each button can have different click action and content.

Highlighted websites which Premium Plan expires soon
Starting today, websites which Premium Plan expires soon will be displayed at the top of the Webmaster's Panel
If the Premium Plan expires in less than 2 weeks, the website will be shown on a separate list above the other websites.
Thanks to this functionality, you will never miss the Premium Plan expiry date and your website will work properly at all times.
July
4 July 2019
Element "Custom HTML CSS JS" can be edited during article edition
We are still in the process of improving articles creation on a website. In the newest features from 17 June, you can read about simplified news edition. Today we also enabled users to modify "Custom HTML CSS JS" element when writing an article.
How to use this feature?
Login to WebWave and in the menu at the top of the builder select News -> News layouts. Choose the news layout where you want to place the HTML CSS JS element. 
From the toolbar on the left side of the builder select three dots icon and the HTML CSS JS element. Place it on a website.

Now, when creating a new article with this particular news layout you can click on the HTML CSS JS element and write any code in it.
Redirecting the user to a place of your choice after sending the form
If you want the user to be redirected somewhere, download a certain file or call you after submitting the form on your website - you can now easily do it in the website builder WebWave.
How to use this feature?
From the toolbar on the left side of the builder select the three dots icon and then Form. Place it on a website.

Select the cogwheel icon at the top left corner of the element and edit content.
To the popup window, the WebWave team added some new functionalities, which activate after the form is send. You can redirect users to:
- Go to object on page
- Webpage
- Go to newspage
- Website address
- More (URL, call, display file, send e-mail)

Select the best option and save changes.
If you want to learn more about form element read more on our knowledge base.
Support for double opt-in in integration with Mailer Lite
In the previous post, we wrote about integration with Mailer Lite. Now WebWave supports also double opt-in. To sign up for a newsletter, the user needs to click the activation link.
This feature can be applied on Mailer Lite website and is automatically transferred to WebWave.
If you don't know how to integrate Mailer Lite with your website created in website builder WebWave, take a look at the article on our knowledge base.
A new way of working with elements in CMS during article edition
Now working in CMS is even more intuitive than ever. After hovering any editable element, you will see a cogwheel icon. 
It displays all available modifications.

10 July 2019
Test the white label and agency domain for 2 weeks free
Do you want to learn more about White Label, but don't have an active 3 Premium Plans yet? Test this feature for 2 weeks for free. Additionally, check how the agency domain works!
How to use this feature?
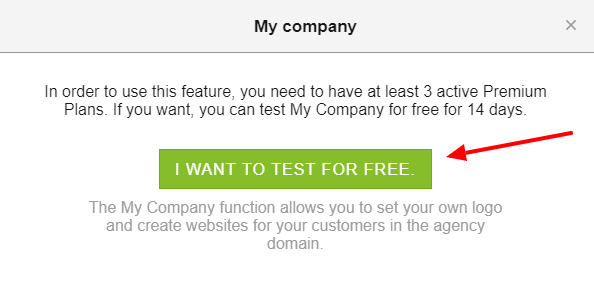
Go to the Webmasters Panel and in the column on the right find My company and press the Enable white label button:
In the new window, you can enable White Label for 14 days. If you want to test this functionality, press the green button:
Fill the form with personal details and start the tests. You have 14 days to test White Label and agency domain:

Disable CMS edit permission on a whole subpage
A webmaster who develops the website can disable CMS edit permission on a whole subpage with only one click.
How to use this feature?
Go to the website builder and open a website. In the Newspages menu at the top right corner of the creator select Show list of articles. 
Go to the chosen subpage and in the Settings Panel select Webpage, CMS edit permission and untick the box next to Allow to edit in CMS. The box is ticked by default.
June
10 June 2019
Change background color in mobile menu
Transparent background of the menu on desktop mode is probably the most common practice. In order to improve menu visibility on mobile devices, you can now set any background color of mobile menu.
How to use this feature:
Enter the website builder, go to one of the mobile screen modes and select the menu element, which background you want to change. 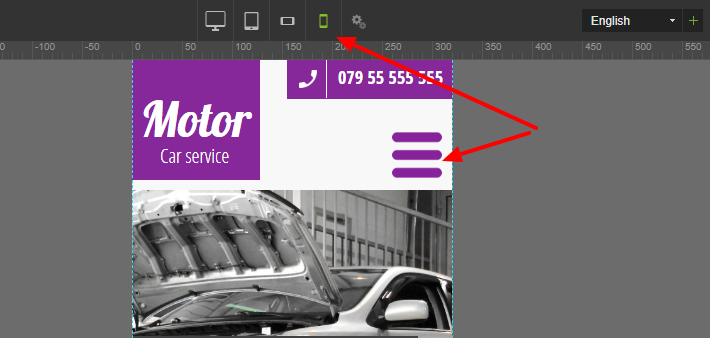 Click on the menu. If the element is a part of the layout, you don't need to change it - simply agree to edit layout object.
In the Settings Panel find Menu settings.

Select a background color and change it. 
In order to edit a single button, select the menu element and in the Settings Panel, in Edit element section, switch the Entire menu to Single button.
In the state you can choose:
-
Normal - view without interactions
-
Hover
-
Active - after a mouse click
In Style, you can choose the background color.

By default, all menu buttons change at the same time. If you want buttons to look differently, you need to find at the bottom of the Settings Panel Default level style section and untick the box.

17 June 2019
Simplified news edition
Along with the newest update, creating news in WebWave is easier than ever. Now you can set elements layout in news template and while creating a new post, all you need to edit the text. No more worrying about accidentally misplacing random components when creating new content.
What has been changed?
-
When editing an article, you can only change certain elements - the ones that after hoovering have a green frame.
-
You cannot change elements alignment - it can be done only in article layout.
-
If during news edition you click on a footer or a layout element, you will see a message that this element can be edited in article template.

Integration with online e-mail marketing system Mailer Lite
E-mail marketing is a great way to stay in touch with customers. With WebWave - white label responsive website builder with no coding - and Mailer Lite you can easily allow users to sign up for a newsletter.
Mailer Lite is an online e-mail marketing system with an intuitive e-mail templates editor and it's now integrated with WebWave.
E-mail is a very personal communication channel between you and your customers. It's the best tool to inform them about the newest events, offers, sales and changes in the company. There are no restrictions and limitations - whatever you want to share with your subscribers - email marketing is the best way to do so.
What's also worth to mention - you can send an unlimited amount of e-mails to 1000 users per month and extending this limit is very cheap.
How to use this feature?
Go to mailerlite.com, create an account and sign in. In the next window select "Complete your profile".
Fill the form and save changes.
Click "Explore integrations".
In the first tab "Developer API" select "Use".
Copy your unique API KEY.
Go to Webmaster's Panel and create a newsletter signup form using the form element, then click on the form and in the Settings Panel select "Edit content". On the right side in the E-mail settings change form type to "Mailer Lite - Email Marketing".
In"API key" field copy the previously copies KEY and CONNECT API:
If you have more than one group of subscribers on your Mailer Lite account, select from the group the list to which you want to add new subscribers. Save changes and publish the website.
May
8 May 2019
Integration with Google Search Console
Thanks to the integration with Google Search Console, users with the Premium Plan will fasten the process of indexing their websites by the Google search. Tools and reports from the Search Console will help you measure the traffic on your website and improve positioning in search results.
How to use this feature?
Sign in to your Google account and enter search.google.com/search-console/welcome
Go to URL prefix, type your site address and continue:

On the next step select verification method the HTML file:

Now, go to the Webmaster Panel and select the website you want to connect with the Google Search Console and go to the builder. In the menu at the top of the creator select "Settings" and "SEO (Google)":

In the new window click on the big green button "I'M UPLOADING A VERIFICATION FILE" and upload the file.

After uploading the file, go back to the Google Search Console and verify the website:

Simplified contextual menu
The contextual menu is the menu which appears after right clicking on the element.
Now, in the simplified menu in a very easy way, you can get edit content, change the style of the element and get element's help.

Nothing to worry about, functions available in the menu before simplification can still be found in the website builder!
Now, you can now add elements to the layout or to the footer in the Settings Panel in the Element on many pages section.

At the bottom of the Layers Panel, you will find a functionality "Move on top"/"Move to bottom" and "Ungroup". By dragging elements in the Layers Panel, you can also place them in the Layout or footer.

In order to Undo, Copy, Paste, etc. you can use keyboard shortcuts or in the menu at the top of the website builder select "Edit".

More convenient access to the icon bank
Starting today, the access to our icon bank is even easier and quicker!
It is now in the Toolbar on the left side of the builder. When you click on the happy face, the icon bank will open.

31 May 2019
Wholesale Premium Plans
Starting today, WebWave users can purchase wholesale Premium Plans.
At the moment we offer three options:
-
1 annual Premium Plan - 7 USD / month / plan
-
3 annual Premium Plans - 6 USD / month / plan
-
10 annual Premium Plans - 5 USD / month / plan
If you build even more websites, drop us an e-mail on sales@webwavecms.com and we will customize the offer for you.
Each pre-paid Premium Plan IS NOT connected to a website and you can activate it any time. Only after you connect a Premium Plan to the website the timer starts counting one year.
How to use this feature:
In the Webmaster's Panel select Premium Plans and "wholesale". 
In the new window, you will see three offers we prepared for you.
After a wholesale purchase, you can manage Premium Plans in the Webmaster's Panel.

For each Premium Plan, the timer starts after you connect it to a website. Wholesale purchase does not activate the Premium Plan.
Access to Backup Copies feature through the CMS
Now users with Administrative role can use Backup Copies feature from the Content Management System.
Admin can both restore and create backup copies.
How to use this feature?
After signing in to the CMS select from the top menu Settings and find Website backup.

You will see a window where you can both restore and create a backup copy.

April
2 April 2019
Access to the second-level menu for CMS users
CMS users with Head Editor and Editor level just gained new, improved access. Now they can easily edit the second-level menu.
How to use this feature:
Sign in to CMS Panel.
Find and select menu edition icon.
Select an element in the menu, which you want to move and drag and drop it underneath another element.

Save changes. This is how a second-level menu looks look like:
Edit product in "Add to shop cart" through CMS
Great news for all CMS users.
Running an online store has never been so easy!
Edit products in "Add to shop cart" in a simple and intuitive way. With this new functionality, you can quickly change texts, price, and images of every product.
How to use this feature?
Sign in to CMS panel on your website.
This is how our shop cart looks now.

Find a shop icon next to "Add to shop cart" button. Change product name, price, and a thumbnail.
WebWave Features 2018.
Read the summary here.
December
12th December 2018
Lazy loading at WebWave!
Even faster page loading in Webwave. Introducing - lazy loading! Lazy loading is an important feature on any page with a lot of pictures. From today, pages made in WebWave will load even faster thanks to this feature. Thanks to it, users will wait even less for the first screen of the page and the graphics in this part. The remaining images will load below as the user scrolls down the page. What does it mean? Even faster page loading! And everyone knows that it is better not to wait long for the first screen of the page to be displayed.
5th December
We have launched a store in WebWave!
From today, in our wizard you will find a long-awaited feature - a store in WebWave!
Thanks to it, you can easily sell products on your website. The combination of WebWave with the new function will allow you to create a unique store. You will start your adventure with selling on the website by clicking the basket icon in the menu.
4th December 2018
WebWave and mail status monitoring
As promised, we have launched a page where you can track the availability status of our wizard and mail in WebWave.
It will help you find out if there are any fluctuations in the availability of services.
In case of Any problems with availability, on this page you will find information about what is happening and when we expect the problems to disappear.
Additionally, you can subscribe to WebWave status notifications, thanks to which you will find out if there are any problems with the availability of our website.
November
22nd November 2018
Information about the publication of the page in the browser tab
Starting today, you can see that "Publishing" appears in the browser tab when a page is published to WebWave.
Thanks to it, you can go to browsing other browser tabs, and when your website is published - a message will appear again that you can continue working in the website creator. :)
14th November 2018
Change in the creator's text menu
Today we made a change to the wizard menu - we removed the "Subpages" drop-down menu.
Its functions have been available for a long time in the drop-down list of subpages in the upper right corner of the wizard.
You can open the subpage management window by clicking on the indicated button in the drop-down list of subpages.
The Editing items section is always visible in the menu
To make creating pages in WebWave even easier, we 'pinned' the Editing Items section to the top of the Item menu.
8th November
Self-rollback of the page to the state before the backup was restored
From now on, all WebWave users can take advantage of another functionality related to the recently added standalone page backup recovery .
Of course, it is about the possibility of reverting the page to the state BEFORE restoring the backup.
October
23th October 2018
"More actions" icon next to items. In the new version, we have added the "More Actions" icon to WebWave. A new icon appears next to the icon that allows you to move all items below.
The icon allows you to call up a context menu - both for a specific element and the entire group of elements.
It calls the same menu that appears when you right-click the item.
10th October 2018
Item Groups - Move items and groups directly to the footer
From now on, all WebWave users can use the new feature - Item groups.
It is a set of predefined groups that will make your website even faster.
Among the ready-made sections in Element Groups, you will find elements such as page headers from the menu, graphics with text, text sections and elements that perfectly match the page footer. So everything a website needs :).
You can change each of the elements added from Groups - text, graphics or colors. Also the layout.
Importantly - the added objects are responsive, that is, for example, after adding a page header from the menu and switching to a different view, the menu will automatically turn into a mobile "hamburger".
September
26th September 2018
Premium package switch and auto domain/email transfer
In the WebWave website builder, you can easily transfer the Premium Package to another website. However, in order for the website to be displayed under the correct domain, the domain must also be transferred.
From today, all WebWave users can transfer the Premium Package, domain and e-mail at the same time.
This functionality is useful, for example, when a new version of the website has been created with a refreshed design.
19th September
Self-recovery of a published page
From now on, all WebWave users can benefit from a big novelty: self-recovery of a published page. Thanks to it, it is easier to restore the page in the wizard to the state in which it is visible on the Internet.
You don't have to exit the Webmaster Panel - three clicks and the site is restored to its previous state.
A backup copy of the page is kept for 30 days from the last publication of the page.
Note that recovering a page means that all changes made after the last publication of the page will be erased!
11th September
New payment window
After today's update, all WebWave users can benefit from the updated payment window.
We have refined them for ease of use and aesthetics.We have also added key information about the Premium Package so that each user knows what is included in the Package.The progress bar informs about the next stages of making the payment, and the editing of data in the window is very simple.
As before - you can choose the payment method (card or quick transfer) and whether you are a natural person or representing a company.
New website creation window
We have also changed the website creation window in the wizard.
In the new window you can choose whether you want to start the project with a blank page or use one of the free website templates.
August
30th August, 2018
Image bank optimization
To speed up the work in the wizard, we have implemented another novelty: optimization of the free image bank, which you can use in the Media Library in WebWave.
Thanks to this amendment, you will find photos much faster and add them to your website.
Speeding up the website builder
At the beginning of September, we promised to speed up WebWave.
As promised - the version published today introduces significant improvements in operation, thanks to which the wizard itself works much faster, as well as switching between responsive views, even on extended pages.
22th August , 2018
Optimizing the page loading speed
Since every second counts when loading a page, we decided to speed up the process on all pages created in WebWave. From now on, after entering the website address, it is found much faster on the server, which reduces the time needed to fully load the page.
SEO improvements on pages
SEO is a very important element on every page, which is why we have improved SEO once again, so that all pages created in WebWave were better rated by Google, and thus could get a better position in the search engine.
The changes we introduced:
- Content of the article is taken into account with empty meta tags
- Automatically add a path to sitemap.xml in robots.txt
- Automatic adding information about the language version of the website to sitemap.xml
Important! For the new SEO features to work on a page that was created prior to this update, you just have to republish it.
August 9th, 2018
Improving the speed of loading fonts from Google Fonts
One of the first elements loaded on the page are fonts. If you are using imported fonts, it also takes some time to load. Since every second is important from the SEO point of view, we have improved the loading speed of fonts imported to the page from Google Fonts.
Augustly 1st, 2018
Popup informing about the operation of external links
Often, WebWave users add buttons to their pages with links leading off the page. In the preview, such links are not active by default, so as not to accidentally disable the wizard. Very often in such cases, customers think that the button simply does not work because they do not know that the button is only active on the published page.
To get rid of this problem, we've added a popup info you, that the button will only work on the published page. There is also a link in the window, so if someone wants to go to the given page from the wizard, of course they also have this option.
CMS displayed in the language of the home page
If you create websites for clients using a language other than Polish, you will surely be pleased to introduce this novelty. From now on, the language of the CMS editor will be automatically set to the same one that was set for the created page.
July
July 18th, 2018
Possibility to disable automatic payment for the domain
From now on you can decide whether your domain name is to be extended automatically or you prefer to do it manually.
July 10th, 2018
The ability to block the change of content in the button
From now on, if you want to have different content in the button after hovering over it with the mouse, you have to enable this option in the button setting. Many users have complained that pre-hover text doesn't change on hover, so we've introduced an option that lets you decide how you want text to behave when you change it.
SEO improvements for multilingual websites
From now on, if the home page has more than one language version, the WebWave wizard tells Google crawlers what content should be displayed to the right audience. This allows you to achieve better results when positioning multilingual websites.
July 1st, 2018
We remove the old mobile version
As of July 1, we remove the possibility of creating mobile pages and replace it with the RWD mode. From now on, all pages in the mobile version must be created in the RWD mode. Such a change will have a positive impact on SEO for websites that previously used the mobile version, but also on the convenience of creating and moderating your website.
Rename for a paid package
Many of our customers have complained that the name "Hosting" for the paid package is misleading so we decided to change it to "Premium".
The premium package allows you to:
- Connecting your own domain
- Hiding WebWave ads on the page
- Indexing of the website by Google
- Create your own mailboxes
- Enable a free SSL certificate
You can read more about the premium package here:
https://webwavecms.com/pakiet-premium
June
June 16st, 2018
Changes in the URL generator
We improved the operation of the link generator for subpages and articles. From now on, the generator ignores special characters, making the links prettier and much more readable for users. Additionally, if you are moving your website, for example from Wordpress, where addresses ending with "/" sign, you can also create such addresses in WebWave.
May
May 30th, 2018
Element hide animation
From now on, you can not only turn on the animation of showing elements on the page, but also the animation of hiding elements. You can use this function, for example, to create a menu that, when you click on a button, will slide out of the edge of the screen, and when you click it again, it will slide back to the same edge of the screen.
May 9th
The possibility of hooking a whole group of elements
In this update, our website builder was given the option to hook an entire group of items, not just individual items as before. This option is especially useful when you want to keep order in the layer list or when you want to hook a large number of elements at once.
April
April 12th 2018
Interactions - a new action after clicking on the button
At the request of our users, we have added a new action after clicking the button - Interactions, which significantly increases the possibilities of creating websites. Interactions are used to hide, show or change the visibility of selected elements on the page.
Thanks to interactions, you can create your own popup, Slider with movie / Lightbox / Newsfeed, extensive menu, cards with different content, drop-down FAQ, Tooltip on photos and many many more..
Ability to disable image compression in the article list
In the WebWave website builder, upon publication, all photos on the website are automatically compressed to reduce their weight. At the time of compression of photos, they may lose a bit of quality, so if you want, you can turn off photo compression - now also thumbnails in the newsfeed.
March
March 28th
Photos in the article in full screen
At the request of our users, we have added a new feature to articles created in the WebWave website builder. From now on, when you click on the image added to the text element in the article, it will be displayed in full screen. Additionally, using the navigation arrows on the sides of the screen, you can switch between all the photos added to the article.
Increasing the meta description length to 300 characters
At the end of last year, Google officially announced that the number of characters displayed in the meta description tag (otherwise: meta tag description) has been changed. From now on, the number of displayed characters is about 300, and not only 160 as before. For this reason, we have introduced a change to the WebWave website creator. From now on, in the 'SEO settings' section of each subpage and article, you can add a meta description of up to 300 characters.
March 14th
Refreshed action management panel after action
We have refreshed the appearance of the 'Action on click' section (in the past, this section was just called 'Link'). From now on, setting any action after clicking on a button, image or slider element is even more intuitive.
March 8th
Brand new drop-down list of pages and articles
We have significantly expanded the possibilities of the drop-down list of subpages, which is located on the top bar of the WebWave website creator, on the right. From now on, it is a drop-down list of pages and articles. Directly from this list, you can even easier navigate between subpages and articles, search for them by names or add new ones. In addition, this list is much more transparent and allows you to expand or collapse the list of subpages or articles, making creating websites even easier.
February
February 27th 2018
Now change the name of the website in website builder
A website with its own name in the WebWave website builder is very important, especially if you have more than one website in your panel. Appropriate naming of the website allows easier navigation between your projects in the WebWave webmaster panel. From now on, renaming a website is even more intuitive.
February 16th 2018
More independent article list settings in RWD views
Every webmaster who thinks not only about the appearance of his website but also from the positioning point of view should run a blog. How to create a blog in WebWave? It's very easy, just create articles and use the newsfeed element. Thanks to the newsfeed, you can easily display articles from the selected category on your website. We have made a few improvements to the operation of the list of articles and from now on even more of its options can be set independently on each of the RWD views.
February 1st 2018
New possibilities of working with groups
Groups is a functionality of the WebWave wizard with a very wide range of applications. They allow you to group items and set relationships between them. Thanks to this, managing elements and customizing the page in mobile views is much more convenient. We expanded the possibilities of groups by adding new, very useful functions. Your own website without coding - you can create it even easier.
January
January 17th 2018
Ability to change the height of editing panels on smaller screens
If the monitor on which you create your website supports only lower screen resolutions, the automatic size of the editing panels may not always be properly adjusted to your requirements. We have made a small improvement, thanks to which you can set the height of the edit panel yourself on smaller screens. Use this website builder and create websites without coding.
January 9th 2018
Ability to re-enable hints
The hints displayed when creating a page are very valuable for new users. So far, they have been included only once, when creating the first website. From now on, you can run them at any time.
WebWave Features 2017.
Read the summary here.
December 19th, 2017
-
Mobile menu
-
Easier use of groups
December 15, 2017
-
Automatic remembering of old links
November 29, 2017
-
New, more convenient multi-item arrangement section
-
Possibility to set the thumbnail in the article to the width of 100%
-
Ability to add a title and alternative text to a photo in a text element
-
Possibility to reset RWD settings only for selected elements
-
Newsfeed automatically displays articles based on the date of publication
September 27, 2017 -
Bank of icons
-
Positioning of elements in relation to the page and in relation to the screen
-
Possibility of linking a telephone number in a text element
-
Highlighting the template elements with the subpage elements in color
-
Adding SVG files to the media library
September 14, 2017
-
New WebWave interface
August 29, 2017
- New features in a small WYSIWYG text editing panel
August 10, 2017
- Possibility to block the download of photos from the website
August 1, 2017
-
The HTML element has the ability to adjust its height to the content
-
A nicer view of newly added elements to the page
- Optimizing the page autosave
July 27, 2017
- interfaceOpen beta tests of the new website builder
July 18, 2017
-
New button animations when hovering over it with the mouse
-
The ability to turn off the visibility of the footer separately for each of the subpages
-
Ability to add a shadow to text directly from the text editing panel
July 12, 2017
-
Independent text alignment for each of the RWD views
June 28, 2017
- Optimization of lists of articles and subpages: search engine and filtering by category
June 13, 2017
-
Free image bank available from the wizard
June 8, 2017
-
Hyphens separating words in sitelinks
May 23, 2017
-
Ability to add an entire family of fonts
- Possibility to verify the correctness of the domain redirection
May 17, 2017
- Possibility to create any link to the subpage and article
May 9, 2017
-
Free SSL certificate for any website with active hosting
April 11, 2017
-
Automatic element centering
April 4, 2017
-
Possibility to add a new font directly from the text editor
-
Fixed errors when creating a table in a text editor
March 22, 2017
-
Ken Burns effect
March 16, 2017
-
Hosting your agency website for the price of the Agency account
March 7, 2017
-
Random transition animation in gallery and sliders
-
Reset any RWD settings in a text element
March 1, 2017
-
Extended possibilities of the Video Player element
February 23, 2017
-
Possibility to add a link to the button and image by the Editor-in-Chief in the CMS
February 14, 2017
-
Possibility to add your own page thumbnail
February 9, 2017
-
Add a movie from the media library in a text element
-
Pages are displayed under the subdomain of the main agency domain with and without www
February 1, 2017
-
Significant expansion of the gallery and slider capabilities
January 24, 2017
-
Sorting photos in the slider gallery and lightbox
January 17, 2017
-
Ability to add a parallax effect to an image element
January 10, 2017
-
Possibility to connect hosting to another website.
WebWave Features 2016.
Read the summary here.
December 20, 2016
-
Possibility to order one collective invoice for the entire month
-
Downloadable invoices available from the webmaster panel
December 15, 2016
-
Folders in the media library
-
Faster opening of the wizard
-
Image adjustment can be set separately for each RWD mode
December 1, 2016
-
Rotation of elements
-
More convenient copying of elements
-
Disabling weekly reports for individual pages
November 21, 2016
-
Four new transition effects in the gallery
-
"News" in the webmaster panel
November 1, 2016
-
Transparent background of elements
-
The gallery, slider and lightbox appear pre-populated with photos
October 19, 2016
-
Element background parallax effect
-
Adding a photo from the desktop - drag & drop
-
Hard space
-
The ability to enable and disable the RWD edition
October 12, 2016
-
Accessibility of the site by password
-
Move items to the footer faster
September 28, 2016
-
Possibility to register domains for a year
-
Possibility to edit the movie in the CMS panel
-
Payment by credit card possible
September 20, 2016
-
Ability to adjust the background image of an element
-
Possibility to add an item "Video Player"
September 8, 2016
-
Possibility to set the size of the photo embedded in the text element depending on the RWD mode
-
Hiding an item in each mode
-
Setting a different amount of leading in different RWD modes
August 30, 2016
-
Element animations
-
Own graphics for scrolling the Slider
-
Possibility to set the html element to 100% width
July 20, 2016
-
Share the page as a template
-
Any size of arrows in slider and gallery
-
Possibility to register domains for many years
June 29, 2016
-
Introducing the possibility of creating responsive websites
April 27, 2016
-
857 domain extensions available from all over the world
-
Renaming of article categories and sorting the list of article categories by name and number of articles
-
Date and time placeholder in the contact form
March 23, 2016
-
Own link in the button Like it!
-
Automatic submission of the sitemap for indexation by Google
-
Connect to e-mail using IMAP
February 18, 2016
-
Possibility to choose the direction of the drop-down menu
-
Sorting articles by category in the article management panel
-
Highlighting spelling errors in the text editor
January 26, 2016
-
Animation of thumbnails in a lightbox
-
Exporting websites to external hosting
-
Sending messages from the contact form from the domain contact-form.info
WebWave Features 2015.
December 17, 2015
-
Any editing of the robots.txt file
-
Change the line height of the text
-
Add files up to 20 MB in size to the media library
November 23, 2015
-
Adding a link to articles and objects on the page in the menu
-
Quickly detach elements from the template and footer
-
Recommend and earn - 30% discount for new users on the first purchase
November 3, 2015
-
Change of the page indicated by the domain
-
Possibility to connect SSL to your website
-
Setting the distance from the top of the screen to which the page is scrolled
October 12, 2015
-
Sending files via the contact form
-
Any file types in the media library
-
Editing any link in the menu
September 8, 2015
-
Administrator's account in CMS
-
Choosing whether the CMS user can make payments
-
Possibility to set a subdomain from www as the main domain of the website
August 17, 2015
-
Agency plan
-
Add your logo
-
Create pages under the subdomain of your own domain
-
-
Weekly visit report
-
PLN 20 as a gift for a registered person
July 14, 2015
-
Website builder performance optimization
-
Share content via Facebook
-
Whitespace in the article summary
-
Possibility to get a premium package for a month absolutely free
June 9, 2015
-
Generating search engine friendly photo names
-
Resources in the media library placed on the domain of the home page
-
Possibility to add ALT attribute to photos in slider, gallery and lightbox
May 19, 2015
-
WebWave Mobile websites - beta version
April 20, 2015
-
Locking guides
-
Easy link selection in the picture in the slider
-
Possibility to delete information that the website uses cookies
March 17, 2015
-
Possibility to link the file in the button
-
Launch of a lightbox and photo gallery in the page view
-
Possibility to edit the form from the CMS panel
February 27, 2015
-
Sitemap sitemap.xml created automatically when publishing pages
-
Subpage management window available from the page creator
-
Integration of news and pages with Facebook news
February 3, 2015
-
Selecting a date and time in the contact form
WebWave Features 2014.
December 19, 2014
-
Page footer
-
Adding MP3 files to the media library
-
Ability to add and link files from the CMS
November 17, 2014
-
A white label for everyone
-
Duplicating news pages and templates
-
Optimizing the opening time of published pages
October 22, 2014
-
Possibility to create your own 404 error page for your website
-
Choosing the main domain for the site and setting a 301 redirect from other domains leading to the site to the main domain
-
Arriving subpage addresses
October 9, 2014
-
Expanding the media library
-
Directly adding photos to the gallery / slider / lightbox
-
Edit the title and alternative text of the photo in the bottom panel
-
Clicking on the title and description of the photo in the gallery / slider allows you to change them
September 24, 2014
-
Domain registration directly from the webmaster's panel
-
Change the label of a button in the menu after double-clicking on it
-
Simplify the handling of templates
September 16, 2014
-
Hiding and showing template elements on the subpage
-
A handle to move an element, and all elements under it
-
Change the default background and text color for stroys
September 3, 2014
-
Change the label on the login item
-
Possibility to create a new subpage as a copy of an existing subpage
-
Editing the date of creating a news item
August 27, 2014
-
Adding your own code to the head section
-
Animation when you hover the mouse over the form submission button
-
HTML element security
August 14, 2014
-
Smooth animation of buttons
-
Anchors in text elements
-
Easier editing of template elements
August 1, 2014
-
Significant increase in the ability to edit the contact form
-
Setting the title and sender of the message sent from the contact form
-
Preview of active and hover status pages in the wizard for menu and button items
July 20, 2014
-
Lots of news templates
-
Photo galleries in the news
-
Stretch elements to 100% of the screen width
July 9, 2014
-
Add elements to the template with one button
-
Change the way of editing elements belonging to the template
-
Possibility to edit e-mail accounts from the CMS level
-
Possibility to change the favicon from the CMS level
June 13, 2014
-
Store .doc, .pdf, .xls, .ppt and other files in the media library
-
Search, sort and filter files in the media library
-
Live chat with WebWave CMS support
June 1, 2014
-
Ability to set h1, h2 ... headings in the text.
-
The ability to create text based on a template
-
Discount
May 11, 2014
-
Optimization of the opening of the page editor
-
Speed up the movement of items in the page editor
-
Allow more operations to be undone in the page editor
April 24, 2014
-
Google map element
-
Video player element
March 31, 2014
-
The form element
-
Possibility to create new pages based on publicly available, ready-made projects
-
Possibility to indicate a person to whom bills for premium packages of the selected website will be sent
March 16, 2014
-
The "comments" element
-
Website users
-
Subpages available only to logged in users
March 2, 2014
-
We have finished the beta stage - the application is fully functional !!!
-
Possibility to create e-mail accounts for websites
-
Button animation setting
-
Website and news administrator in the CMS panel
February 24, 2014
-
A major overhaul of the menu item
-
Search, filter and sort created sites
-
Editing the news list from the CMS level
-
Cropping photos from the CMS level
February 8, 2014
-
A major overhaul of the text editor
-
Remembering recently used colors
-
Facilitating adding new photos to your media library
-
Element "like it"
-
Facelifting of the webmaster's panel
-
Information on the use of cookies
January 29, 2014
-
Selecting multiple objects with the mouse at once
-
Editing icons and the outline of the selected element are always visible
-
Displaying existing buttons and pagination in the page preview and CMS panel
-
Thumbnails of pages in the Webmaster panel
January 19, 2014
-
Creating website users and assigning them roles
-
CMS panel for website editors
-
Importing your own js libraries and css files to the website
-
Adding individual elements to the template
January 11, 2014
-
Anchors leading to items on other pages
-
Ability to add your own JS code
-
Pagination of the news list
-
View the real news in the website builder
-
100% screen width slider
-
DEMO version with a tutorial for unregistered users
-
Deleting photos from the library
-
Ability to create new pages based on pages previously created by you
-
Possibility to create new pages based on sketches
WebWave Features 2013.
December 24, 2013
-
Possibility to add your own HTML and CSS code
-
Expanding the functionality of newsfeed and news
-
100% wide groups
December 14, 2013
-
Individual subdomains for each website
-
Possibility to connect your own domain
-
Style edit for photos in Lightbox
-
Multiple webmasters edit page control
-
Lifting - improving the readability and transparency of the website
December 6, 2013
-
Links with an anchor
-
Remove Word formatting when pasting text
-
Position and style of text on buttons
-
Password reminder
November 30, 2013
-
Possibility to remove websites
-
Reconstruction of the CMS panel for clients
-
Adding a moving background for the page
November 22, 2013
-
Quick preview of the page from the GUI panel
-
New default styles for items
November 19, 2013
-
WebWave is born
![]()
WebWave website builder is your AI-powered solution for building an online presence. Create your website in 3 minutes, add an online store or a blog, and grow your business.
We created this website with WebWave.
Follow us on social media